
Star
Trek Armada : A guide to making maps
| Map Editor Guide Home | Calrissian.com Home |
Sub-Index
Setting Map Attributes
Adding graphics to the mini-map
Setting Map Attributes
For most maps, you will need to specify what the levels are... of dil. crew,
officers.
To access the map properties, Press the 'Ctrl' button and 'R' at the same time
As shown below, the standard map dialog box...
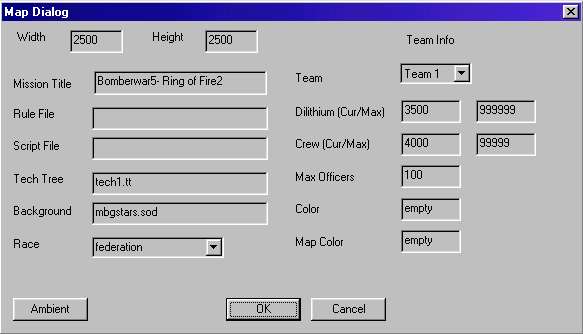
Mission Title : This can be anything
you like, although must'nt be longer than about 25 characters.
Background : There are various backgrounds, different star formations etc,
however, i never bother with this.
TEAM INFO. section
For each, you can set the starting level of dil, crew, max. officers.
If you click on the drop down arrow for 'team' you can change the levels for
other teams.
You should not mess with 'Race' as seen on the bottom left of the map dialog
box, it should not be messed with at all.
ALL other factors on this page, such as script file, map colour etc, are best
left alone !
Adding text lines etc, to the minimap picture
Okay...so you've completed you map.
Next, you want to add some text/graphics to the map picture that people will
see.
BUT ! first, you should at least TEST out your map.. for a number of reasons.
1. You may have inadvertantly
allocated ships/bases to the wrong team.
Sometimes a turret for team 2 is allocated to team 3 -
which is obviously not good
2. Sometimes, ships/bases dissapear !
This is often the case when a 'camera' is placed next
to the players starting ships/bases. When the game starts, the units simply do
not appear.
This is an occasional bug in the map making process.
3. If you spend time adding text to the minimap picture, only to find out the
map has dissapearing ships or ships/bases allocated to the wrong team, then this
is really going to annoy you !
So, i strongly suggest you run the map in 'instant action' mode first, checking
to see that ALL ships/bases do appear, and they are allocated to the correct
team.
Once you have tested your map out, and think it is okay... then it is time to
add some minimap text etc...
Adding graphics...
Personally, i used Paint Shop pro 7, very simple, and this is usually cheap to
buy (unless you're gonna get a copy 'another way')
1. All your maps are stored by default in the Armada 'add on' folder.
As shown below, a snapshot from the 'addon' directory for the map 'ms_bomb_yw1'

Each map is composed of three parts, the minimap picture, the map details (.bzn)
and an .mdf file.
2. To add text etc to your mini map, you just open up the .bmp file.
3. First things first, once again.......
Before you add anything to your minimap picture, you should RESIZE the minimap.
ALL Minimaps should be resized to : 128x128 pixels.
Anything larger than this, and the map will be too large to show.
Also, if you resize your map AFTER you add text/graphics, the text will likely
be mostly unreadable and look awful.
4. Once you have resized your map,
you may then add text, or graphics to it.
Note that you do not want to add multiple layers of
pictures to maps, since they simply take too long to download.
Well, that completes the guide, the
last page summarises a few common problems.
Final notes :
Problems with the Editor ?
Last updated :
16/04/03