Star
Trek Armada : A guide to making maps
| Map Editor Guide Home | Calrissian.com Home |
Making your First Map
First, Ensure you have your Armada Disk in your drive, or your system might well
lock up if it tries to load without it,
Click on your newly created Armada Editor shortcut, and now.... Armada should now load up in its 'map
editor' mode.
Once you have loaded the map editor, you
will have one of the following scenarios...
1. The map screen will be totally bare.
2. There will already be items placed on
the map.
This will of course depend on what 'map name' you decided upon in your 'target
line'.
You can of course enter in the 'target line' the name of an existing map, one
that you wish to modify/improve upon.
Setting Map Size
The VERY first thing you should do
when starting work on a BRAND NEW map, is to do decide upon the map size
1. You need to open up the map dialog
screen.
Press the 'Ctrl' button and 'R' at the same time... this should bring up the
following screen...
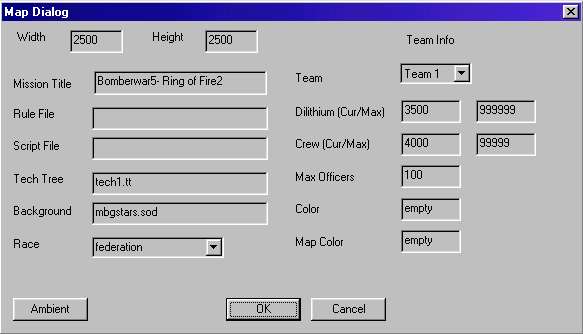
As you can see, there is quite a bit of data you can specify here. However, let
us concentrate on setting the map size....
Summary guide to Map sizes:
| Map size | Type of Map |
| 1000x1000 - very tiny miniwar | Map that fills up just one screen |
| 2000x2000 - standard yardwar | 4 player Yard War |
| 6400x6400 - the Standard size | Medium map |
| 10,000x10,000 | Large Map |
| 15,000x15,000 and above | Enormous map ! |
Notes
-The larger the map, the slower and the more likely you will encounter problems,
such as the out-of-sync issue. However, you can get away with very latge
mini/yardwars, since they usually only contain very small numbers of ships/ map
objects.
-Map size : the Width and height do not necessarily have to be the same,
although 99% of maps are made square.
- Largest map i ever made was 18,000 square, ms_4sy1 - a yardwar that takes
usually takes an hour to win, due to it's immense size.
If you change the map size, you Should then proceed to Immediately SAVE the
map, close the editor Fully, and THEN restart the editor.
Note that, changes in map size ONLY happen AFTER you save the map and close the
editor. Yes, this process seems very odd, and is indeed damn annoying at times.
A potential problem is that, once you close the editor Windows then Refuses to
allow you to open up the editor again ! You must then restart your computer if
you are to work with the editor again.
It is this problem that really annoys a lot of people - myself especially.
Saving your Maps
The Map editor is Notoriously Unstable at the best of times, i suggest you save
your work every 10 minutes.
To save your map...
Press the 'Ctrl' button and 'S' at the same time... this should bring up the
following screen...
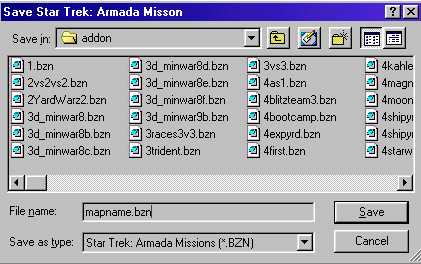
Remember, you should save your map as a .bzn file in the 'addon' folder. Map
filename containing NO capital letters and NOT longer than 11 characters.
Player Starting positions
Tip : First, zoom out on the map, using the '-' key on the far right of your
keyboard. This will give you a much better perspective of your map.
To set the starting position, and the
number of players for a given map, you need to 'set camera' positions.
1. You need to Hold down the 'ALT' key, and at the same time click somewhere on
the map. This brings up this pop-up...
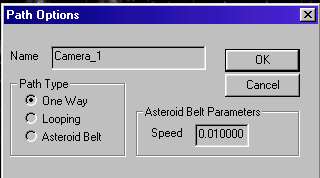
The ONLY thing you should TYPE here is 'Camera_1', 'Camera_2',
etc etc.
***special note***
Camera names must be in lower case....except for the first letter.
So...... 'Camera_1' is correct, whereas 'camera_2'
is wrong !
Each camera on a map, represents the starting view for each player - and not
necessarily where there starting bases/ships may be located.
Camera_1 would represent the starting position for player one, and
so forth. You get the idea. As expected, you can set no more than 8 cameras on a
map.
Once you 'okay' it , you should see the following on your map....
 this icon designates the camera position.
It CAN be moved, by a click-hold on the flag pole, and then dragging it to any
location you wish on the map.
* Potential problems
1. You get two poles in the same place - this is VERY annoying, they can
appear 'linked' -this is something to do with pathing for the AI, and i won'nt
note anything else on this pathing matter. If a camera appears linked to
others , you MUST delete it and place a new camera.
2. Sometimes there are indeed 2 cameras in exactly the same position - which
makes it hard to spot ! This is one primary cause for maps not working properly.
TAKE Great care when placing the camera's on your map.
3. I suggest you save each time you place a new camera on the map, the Editor is
VERY unstable whenever you are placing cameras, and is liable to crash.
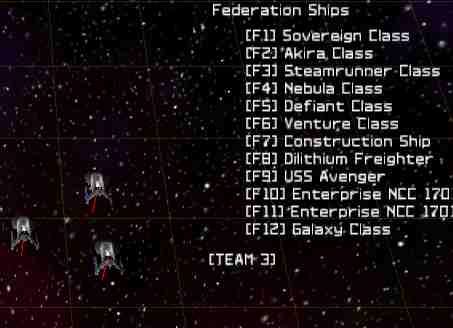
Placing ships and other map
objects
This is easy to do... simply select one of the menus , such as F1 or F3 - using
the Function keys.
Notes
- All objects can be easily dragged across the map
- If can manually change the team allocation for any ship/base by clicking on
it, and changing the team number.
- A common problem is that people allocate ships/bases wrongly, always pre-test
your maps before sharing them in the games room.
- To delete objects/ships, left click hold, and press the 'delete' key.
-
To go back on the main 'build menu' , press the TAB key (looks like this:
← → ) - this is
the key above 'caps lock'.
The build menu has does has a fair number of sections.
BUT ! in the case of ships/bases, you
need to make sure they are allocated to the correct team.
The screenshot below shows 3 akiras allocated to team 3.
To change Team, press the shift '↑' key and
at the same time, use
either the up or down arrow key to change team.
Worm holes/ temporal gates.
You should always set down these in pairs. Otherwise, any ships that enter such an 'odd' portal will simply disappear !
This is actually one interesting thing you could do on a map, with say a number
of wormholes, have 7 of them. 6 of them are linked, with one wormhole that leads
to nowhere - it would sure annoy a few noobs in a yardwar for instance ;0
Nebulas
Nebulas always look good on a map, but.. if you use too many, the map will work
too slowly and be unplayable.
You can 'stack' nebulas on top of each other, so that a damaging red nebula on
top of a radioactive yellow nebula will cause severe damage to ships.
Map lighting
Map Lighting can be changed really quite dramatically. Amongst the sub-menus of
the build menu, you can select a 'map light'.
You are able to set various properties- such as colour, intensity etc. You can
also change the direction of the light, so that ships/bases look really cool.
|
To change the direction of the
light, use right click hold on the light, and move the mouse around. |
|
Problems though...
-Be careful in how you mess around with map lighting. Some map makers have
really stupid colours for lighting, making everything look green ! This is too
bloody stupid, everything looks the same, making it harder to work out whose
units belong to who.
-Do not have crazy dark lighting which makes map objects practically invisible,
it really just annoys people more than anything else
Generally, the default level of lighting works just perfectly.
Proceed to
Modifying the Ship/Unit's levels
Last updated :
07/08/04